Interpret Kitchen Lay-out
LEARNING OUTCOMES:
At the end of this Lesson you are expected to do the following:
LO 1. Read and interpret kitchen plan
LO 2. Create kitchen lay-out
At the end of this Lesson you are expected to do the following:
LO 1. Read and interpret kitchen plan
LO 2. Create kitchen lay-out
DEFINITION OF TERMS
Work Centers – focused around major appliances – refrigerator-freezer, range, or sink. These centers make possible an orderly flow of activities connected with food storage, preparation, cooking serving, and clean-up.
Work Flow – where work is done most efficiently when it flows in a natural progression, either from left to right or right to left.
Work Simplification – means doing the job in the easiest, simplest and quickest way.
Work Station – simply means a specific work area where a particular kind of food is produced or a specific job is done.
Work Triangle – an imaginary line drawn from each of the three primary work stations in the
kitchen, and avoid traffic flow problems.
LEARNING OUTCOME 1
Read and interpret kitchen plan
Performance Standards
- Sign, symbols, and data are identified according to job specifications.
- Sign, symbols and data are determined according to classification or as appropriate in drawing.
Materials
- Actual kitchen lay out
- Pencil
- Bondpaper
insert "What Do You Already Know?" here
What Do You Need To Know?
Read the Information Sheet 1.1 very well then find out how much you can remember and how much you learned by doing Self-check 1.1.
Information Sheet 1.1
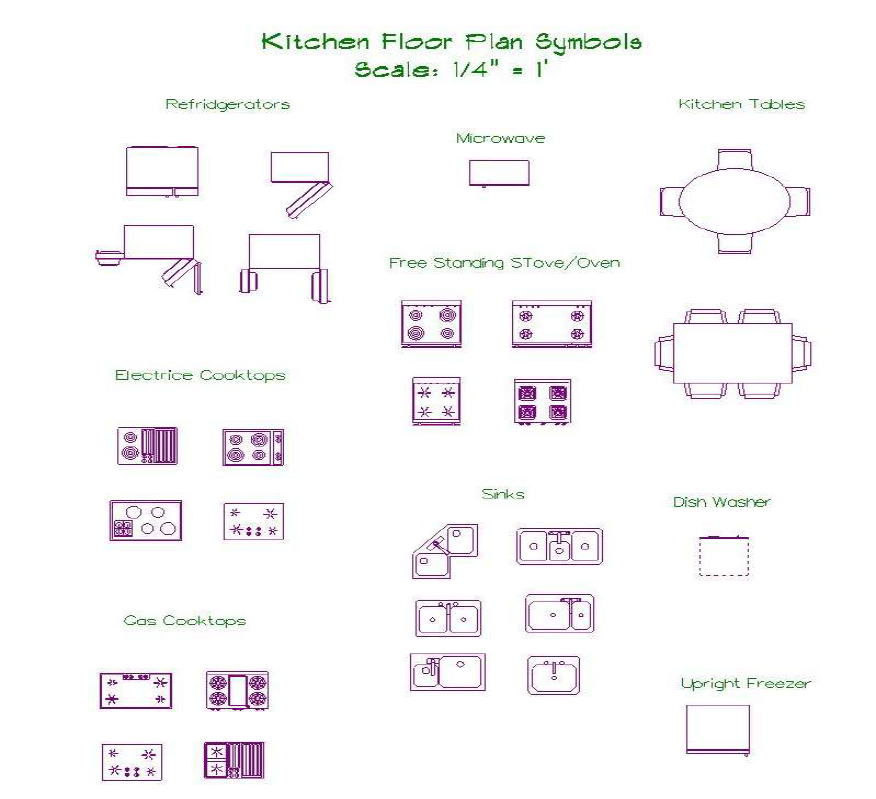
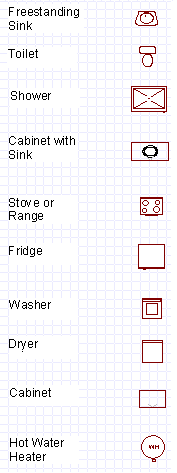
Kitchen floor plans and symbols
Information Sheet 1.1
Kitchen floor plans and symbols
http://content.cteonline.org/resources/documents/35/35a2a92d/35a2a92d5da7e3be8ada54c723bf67448495382e/KitchenFloorPlanSymbolsAppliances.pdf
Kitchen Floor Plans and Symbols
Kitchen Floor Plans and Symbols
insert "How Much Have You Learned?" here
How Do You Apply What You Have Learned?
Show that you learned something by doing this activity
Activity Sheet 1.1
After having discussed the different kitchen floor plans and symbols , you are now ready tolay-out your own dream kitchen. Complete your sketch by placing the necessary symbols to show the different appliance, counters, areas and the direction of work flow. Use a separate sheet.
Activity Sheet 1.1
After having discussed the different kitchen floor plans and symbols , you are now ready tolay-out your own dream kitchen. Complete your sketch by placing the necessary symbols to show the different appliance, counters, areas and the direction of work flow. Use a separate sheet.
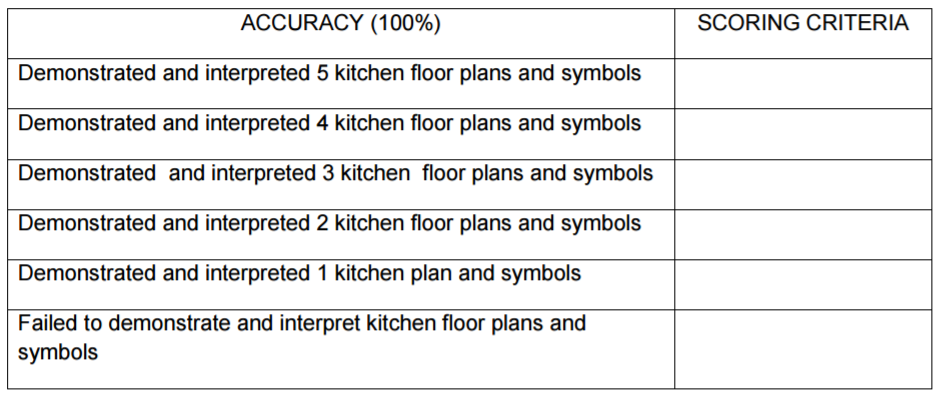
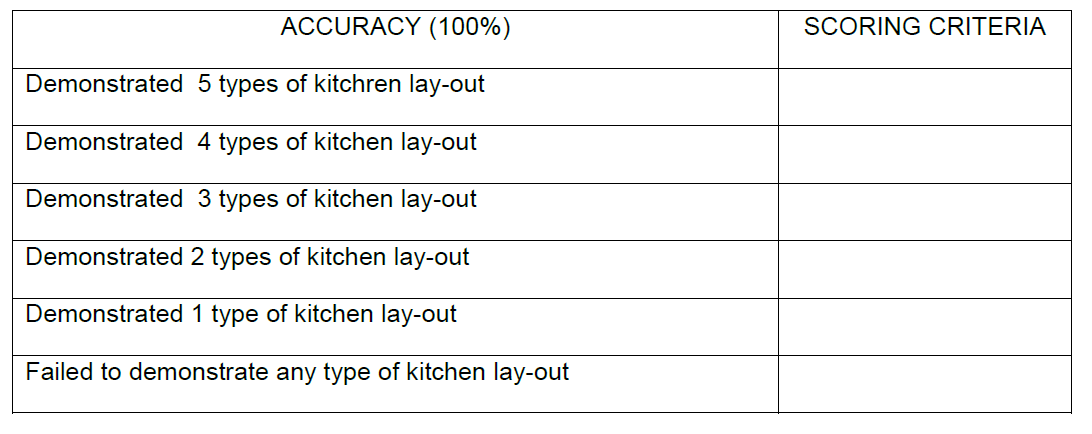
How Well Did You Perform?
Find out by accomplishing the Scoring Rubric honestly and sincerely. Remember it is your learning at stake!
LEARNING OUTCOME 2
Create kitchen lay-out
PERFORMANCE STANDARDS
Materials
- Types of kitchens and appropriate layouts are identified.
- Familiarization with signs, lines and symbols of kitchen layouts.
- Sign, lines and symbols are used appropriately.
Materials
- Actual kitchen lay out
- Pencil
- Bondpaper
insert "What Do You Already Know?" here
What Do You Need To Know?
Read the Information Sheet 2.1 very well then find out how much you can remember and how much you learned by doing Self-check 2.1.
Information Sheet 2.1
UNDERSTANDING THE BASIC KITCHEN LAYOUT
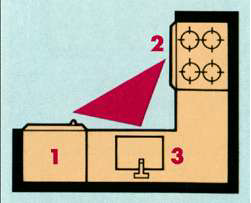
Understanding the basic principles of kitchen layout will help take much of the mystery out of the design process. One of the most basic layout principles is the work triangle. The work triangle is an imaginary line drawn from each of the three primary work stations in the kitchen - the food storage, preparation/cooking, and clean-up stations. By drawing these lines, you can assess the distance required to move to and from each area and thus determine how well the traffic will flow. To help avoid traffic flow problems, work triangles should have a perimeter that measures less than 26 feet.
The three primary kitchen work stations which create the work triangle are:
Work Station
Understanding the basic principles of kitchen layout will help take much of the mystery out of the design process. One of the most basic layout principles is the work triangle. The work triangle is an imaginary line drawn from each of the three primary work stations in the kitchen - the food storage, preparation/cooking, and clean-up stations. By drawing these lines, you can assess the distance required to move to and from each area and thus determine how well the traffic will flow. To help avoid traffic flow problems, work triangles should have a perimeter that measures less than 26 feet.
The three primary kitchen work stations which create the work triangle are:
- The food storage station - Your refrigerator and pantry are the major items here. Cabinetry like lazy susan or swing-out pantry units adds function and convenience. Options like wine racks, spice racks, and roll-out trays help to organize your groceries.
- The preparation/cooking station - Your range, oven, microwave, and smaller appliances are found in this area. Counter space is important in this section. Conserve space by moving appliances off the counter with appliance garage cabinets and space-saving ideas like towel rods and pot lid racks.
- The clean-up station - Everyone's least favorite activity is one of the kitchen's most important - clean-up. This area is home to the sink, waste disposal, and dishwasher. Cabinetry for this station is designed to organize with the trash bin cabinet and roll out tray baskets for storage convenience.
Work Station
DETERMINING YOUR KITCHEN’S LAYOUT
Since the kitchen is one of the most active work areas of the home, it is important to select the right layout to complement your lifestyle and taste.
There are five primary kitchen layout shapes - the U-Shaped, L-Shaped, Island, G-Shaped, Corridor/Gallery, and Single Wall shapes.
After learning about the work triangle in the section "Understanding Basic Kitchen Layout," you will now see how the work triangle functions in each layout and the advantages each layout offers.
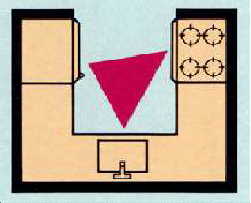
1. The U-Shaped Kitchen - Named for the "U" shape it resembles, this kitchen is popular in large and small homes alike.
Since the kitchen is one of the most active work areas of the home, it is important to select the right layout to complement your lifestyle and taste.
There are five primary kitchen layout shapes - the U-Shaped, L-Shaped, Island, G-Shaped, Corridor/Gallery, and Single Wall shapes.
After learning about the work triangle in the section "Understanding Basic Kitchen Layout," you will now see how the work triangle functions in each layout and the advantages each layout offers.
1. The U-Shaped Kitchen - Named for the "U" shape it resembles, this kitchen is popular in large and small homes alike.
- Perfect for families who use their kitchens a great deal
- Provides plenty of counter space
- Efficient work triangle
- Can convert one cabinet leg into a breakfast bar
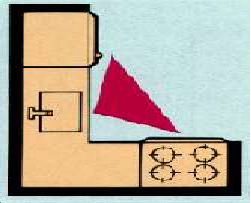
2. The L-Shaped Kitchen - This kitchen shape is one of the most flexible and most popular, providing a compact triangle.
- Very flexible layout design
- Major appliances can be placed in a variety of areas
- Work areas are close to each other
- Can easily convert to a U-Shape with a cabinet leg addition
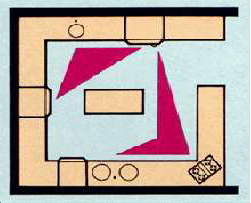
3. The Island Option. Islands are extremely popular in homes today and are most often seen in L-Shaped kitchens. Islands can not only keep work areas traffic-free, but also create a wealth of extra counter and storage space. An island can be an indispensable food preparation station or act as a butcher block area. The island is also an ideal place to add an extra sink or an island grill.

4. The G-Shaped Kitchen - Built very much like the U-Shaped with the addition of an elongated partial wall, the G-Shaped kitchen offers a great deal of space.
- Ideal for larger families needing extra storage space
- Plenty of counter and cabinet space
- Multiple cooks can function well in this layout
- Can convert one cabinet leg into a breakfast bar or entertaining area
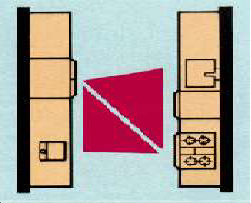
5. The Corridor/Galley Kitchen - This style kitchen makes the most out of a smaller space.
- Great for smaller kitchens
- Appliances are close to one another
- Easy for one cook to maneuver
- Can easily convert to a U-Shape by closing off one end
6. The Single Wall/Pullman Kitchen - Designed for homes or apartments, the single wall kitchen offers a very open and airy feel.
- Ideal for apartments and smaller homes
- Works well with the open designs found in many contemporary homes
- Small moveable table can provide eating space
- Can be enhanced with the addition of an island
insert "How Much Have You Learned?" here
How Do You Apply What You Have Learned?
Show that you learned something by doing this activity
Activity Sheet 2.1
Group
Collect pictures of different types of kitchen. Label each type properly on a 2 x 3 inch illustration board.
Activity Sheet 2.1
Group
Collect pictures of different types of kitchen. Label each type properly on a 2 x 3 inch illustration board.
How Well Did You Perform?
Find out by accomplishing the Scoring Rubric honestly and sincerely. Remember it is your learning at stake!
Congratulations! You did a great job! Rest and relax a while then move on to the next lesson. Good luck!
REFERENCES
LO1
http://content.cteonline.org/resources/documents/35/35a2a92d/35a2a92d5da7e3be
8ada54c723bf67448495382e/KitchenFloorPlanSymbolsAppliances.pdf
- Author, copyright year, title, place of publication: publishing house
- http://library.thinkquest.org/TQ0312380/machine.htm
- http://www.agmachine.com/xmmd43d.htm
- http://library.thinkquest.org/TQ0312380/machine.htm
- http://www.agmachine.com/xmmd43d.htm
