Lesson 4
Perform Basic Maintenance
Learning Outcomes
At the end of this lesson you are expected to do the following:
LO1. Operate machine and assess its performance;
LO2. Clean and Lubricate machine; and
At the end of this lesson you are expected to do the following:
LO1. Operate machine and assess its performance;
LO2. Clean and Lubricate machine; and
Definition of Terms
Absorbent – a material property that sucks-up or takes in the manner of sponge.
Adjust – change present setting as in adjusting tensions.
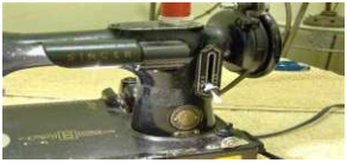
Balance wheel – the wheel at the right of the arm that sets the mechanism in motion.
Band wheel – the wheel below the upper mechanism that leads the balance wheel through the belt connection
Band wheel crank – moves the band wheel.
Bent – a change of shape or angle caused by pulling or pricking to a harder part such as machine needle driven out of throat plate slot.
Blunt – refers to an unsharp or dull needlepoint that is irreplaceable.
Damp cloth – a cloth applied with moisture on water.
Entangle – forming knots like thread entangled in the bobbin case.
Feed dog – the toothed part mounted on the throat plate that helps move the fabric against the presser foot.
Fault – something is wrong with the machine, system, design etc, which prevents it from working properly.
Gummy – a thick of sticky quality such as oiled accumulated dust on sewing machine part.
Jam – to cause a machine to stuck fast so that it cannot work.
Lift – moving upward as in a presser foot lifter.
Lubricant – a material capable of reducing friction when applied between moving parts.
Lubricate – the act of applying a lubricating agent between moving parts to reduce friction and preventing the form of rust.
Manipulation – the act of managing or operating manually or mechanically a given tool or equipment.
Posture - the correct working body position for a given task.
Pucker – wrinkling of fabric caused by very tight stitches.
Replace – putting something new in the place of an old or damaged part.
Rewind – winding again or repeat winding.
Stitch length – the length of each individual stitch.
Stitch regulator – the part of a sewing machine that controls the stroke of the feed dog and regulates the length of stitches.
Treadle – this is where the feet rest to drive the band wheel through the pitman rod.
Tension – the force that is applied by the machine on your thread.
Trend – a general tendency in the way a situation in changing or developing.
Vital – extremely important and necessary for something to succeed or exist
Absorbent – a material property that sucks-up or takes in the manner of sponge.
Adjust – change present setting as in adjusting tensions.
Balance wheel – the wheel at the right of the arm that sets the mechanism in motion.
Band wheel – the wheel below the upper mechanism that leads the balance wheel through the belt connection
Band wheel crank – moves the band wheel.
Bent – a change of shape or angle caused by pulling or pricking to a harder part such as machine needle driven out of throat plate slot.
Blunt – refers to an unsharp or dull needlepoint that is irreplaceable.
Damp cloth – a cloth applied with moisture on water.
Entangle – forming knots like thread entangled in the bobbin case.
Feed dog – the toothed part mounted on the throat plate that helps move the fabric against the presser foot.
Fault – something is wrong with the machine, system, design etc, which prevents it from working properly.
Gummy – a thick of sticky quality such as oiled accumulated dust on sewing machine part.
Jam – to cause a machine to stuck fast so that it cannot work.
Lift – moving upward as in a presser foot lifter.
Lubricant – a material capable of reducing friction when applied between moving parts.
Lubricate – the act of applying a lubricating agent between moving parts to reduce friction and preventing the form of rust.
Manipulation – the act of managing or operating manually or mechanically a given tool or equipment.
Posture - the correct working body position for a given task.
Pucker – wrinkling of fabric caused by very tight stitches.
Replace – putting something new in the place of an old or damaged part.
Rewind – winding again or repeat winding.
Stitch length – the length of each individual stitch.
Stitch regulator – the part of a sewing machine that controls the stroke of the feed dog and regulates the length of stitches.
Treadle – this is where the feet rest to drive the band wheel through the pitman rod.
Tension – the force that is applied by the machine on your thread.
Trend – a general tendency in the way a situation in changing or developing.
Vital – extremely important and necessary for something to succeed or exist
LEARNING OUTCOME 1
Operate Machine and Assess Its Performance
PERFORMANCE STANDARDS
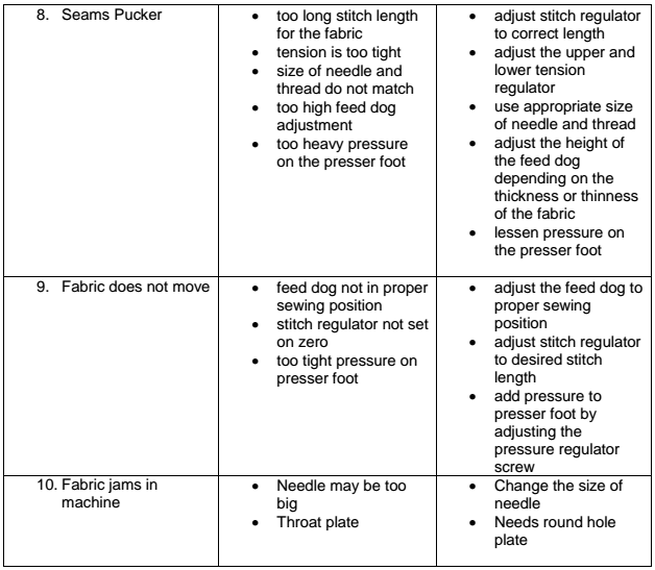
Materials
Set of sewing machines
Operate Machine and Assess Its Performance
PERFORMANCE STANDARDS
- Proper handling of machine is observed.
- Correct procedures in machine operation are identified.
- Common machine troubles are resolved.
Materials
Set of sewing machines
What Do You Need To Know?
Read the Information Sheet 1.1 very well then find out how much you can remember and how much you learned by doing Self-check 1.1.
Information Sheet 1.1
Setting of Sewing Machine and Its Troubles
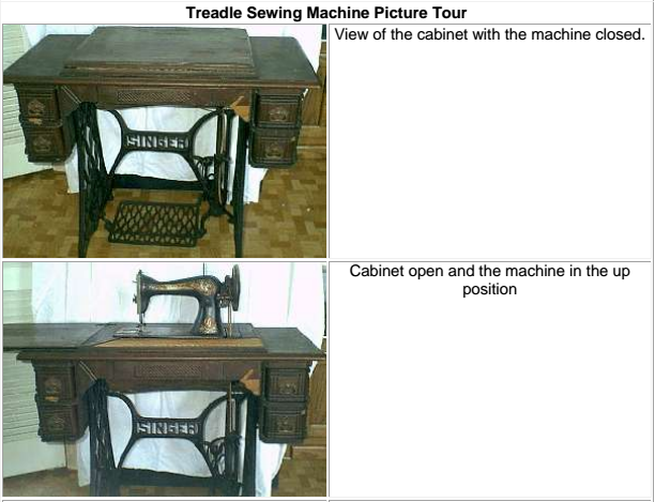
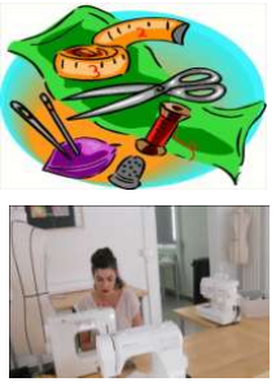
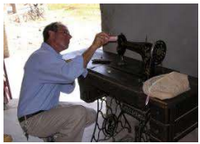
A treadle sewing machine works by foot action and doesn't require any electricity. If taken care of properly, an antique treadle sewing machine can sew a better stitch than its modern counterpart can. It takes some practice to keep your treadle machine sewing smoothly, but once you've mastered the foot action, you can enjoy sewing and getting a little exercise at the same time
Read the Information Sheet 1.1 very well then find out how much you can remember and how much you learned by doing Self-check 1.1.
Information Sheet 1.1
Setting of Sewing Machine and Its Troubles
A treadle sewing machine works by foot action and doesn't require any electricity. If taken care of properly, an antique treadle sewing machine can sew a better stitch than its modern counterpart can. It takes some practice to keep your treadle machine sewing smoothly, but once you've mastered the foot action, you can enjoy sewing and getting a little exercise at the same time
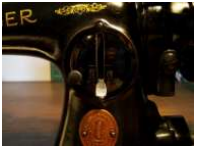
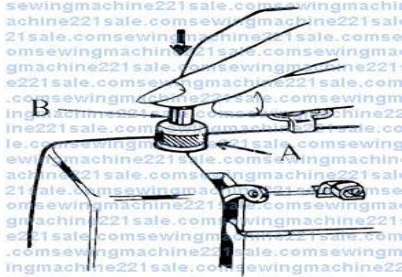
SETTING OF SEWING MACHINES
Perfect machine stitching is easy to achieve if you set the machine properly. This involves threading the upper and lower parts of the sewing machine. The beginner In dressmaking must learn how to thread the head of the sewing machine as one of the first steps in becoming a competent operator.
THREADING THE MACHINE
Each part of the threading mechanism on the head of a sewing machine has a definite purpose in guiding the thread from the spool to the needle. The thread must pass through the various guides in a given order so that the machine will sew properly the formed stitches.
A. ORDER OF THREADING IN THE UPPER PART
1. Spool Pin
2. Upper thread guide
3. Between metal disc of tension
4. Thread take up lever
5. Lower thread guide
6. Needle
STEPS:
1. Put the spool of thread on the spool pin.
2. Bring the thread to the thread guide .
3. Pull the thread between the metal disc of the tension.
4. Bring the thread up to the thread take up lever and raise it as it goes.
5. Pull the thread down to the thread guide.
6. Pull it through the lower thread guide.
7. Thread the needle.
1.THREADING THE LOWER PART OF LOCKSTITCH SEWING MACHINE/ or TREADLE SEWING MACHINE
STEPS:
1. Remove the bobbin case by pulling on the bobbin case latch.
2. Remove the bobbin from the case and wind the thread.
3. Put the bobbin back to the bobbin case and pull the thread through the little slot at least 4 inches.
4. Be sure that you hear the bobbin case inside the shuttle.
5. Start the mechanism by rolling the balance wheel forward to get the thread of the bobbin through the needle. 6. Pull the upper and lower thread together by 4 inches.
As you enjoy using your sewing machine, problems cannot be avoided, but knowing its causes is another challenging skill to develop. How can you classify these problems or troubles?
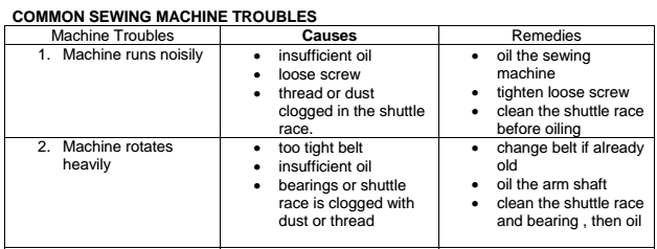
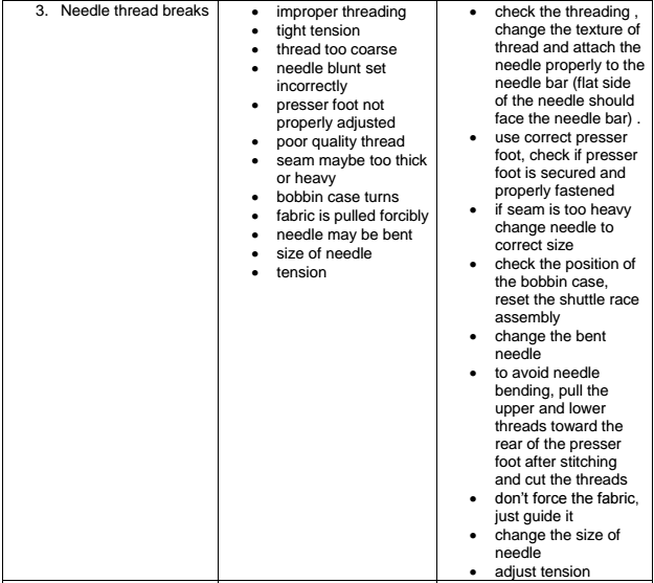
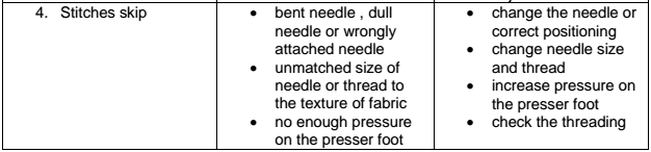
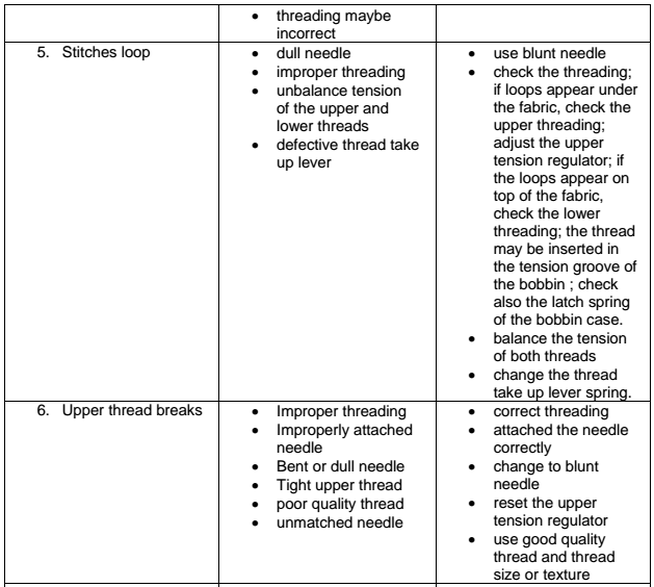
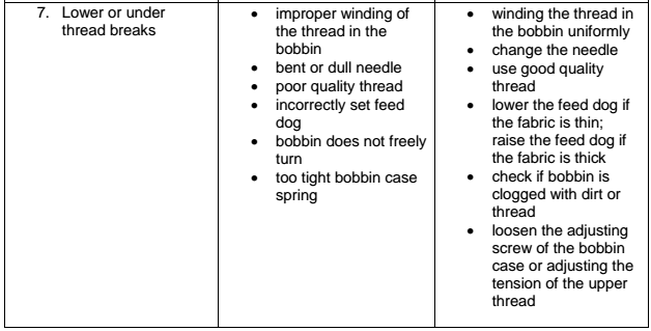
CLASSIFICATIONS OF SEWING MACHINE TROUBLES
If the sewing machine in your laboratory are kept in good condition and are carefully adjusted and properly threaded, not too many things can go wrong. But there are certain difficulties that occur during an operation so often, so you should know these minor and common problems their causes and remedies. There are two classifications of sewing machine troubles, namely:
1.Minor sewing machine trouble
This refers to problems that arise involving incorrectly attached accessories or supplies, unadjusted tensions, or that requires a little dusting or oiling.
2. Major sewing machine trouble
This involves replacing or removing damage spare parts that made the sewing machine not totally functioning.
|
STANDARDS FOR SEWING MACHINE OPERATIONS
Observe while using / running sewing machine and list the things that you have noticed. By following correct procedures you will make your work easier, more interesting and challenging. Here are some pointers that you have to follow in the manipulation of your sewing machine: 1. Start with the right tools and supplies. Have your needle, thread, screw driver, pins and scissors ready for use. With tools at hand, you can start working continuously on your machine. 2. Always maintain good working posture. Sit on your back slightly leaning forward. It can prevent body pains after working on your machine. 3.Thread the sewing machine correctly. You can follow the guide book if you have. This will save your time to get a correct threading. Refer to someone to check if you have threaded it properly. 4. Be sure that the needle is properly set according to the directions for specific models. A properly attached needle will make your work without any trouble. 5. Set the stitch regulator according to project specifications and test the stitches for possible adjustments. 6. Check tension dials and adjust according to project requirement of the stitches. A correct adjustment on the tension dials will make perfectly sewn garment. 7. Turn power off (for motorized/electric machines ) when the sewing machine is not in use. This will save electricity and avoid possible minor accidents. 8. Keep sewing tools. Dust the sewing machine then put a little amount of machine oil in slots. This will make the sewing machine available for the next user |
|
Note: The control of the sewing machine lie on your feet not in your hand so learn to start and stop the sewing machine instantly at a given point using this control. Lower the presser foot while sewing but be sure to insert a piece of paper or fabric swatches so that the feed dog will not be worn out.
Getting to stitch
Before you start, make sure the two threads are back between the two toes of the presser foot.
CHARACTERISTICS OF GOOD STITCHES
1. The length of stitch is proportioned to the texture of the fabric.
2. The stitches are the same in length.
3. The stitches appear the same on both right and wrong sides of the fabric.
4. The stitching follows the intended line smoothly and accurately.
5. There are no skipped or broken gaps in stitching.
6. When retraced, it appears as one line of stitching.
7. The stitching has no tangles.
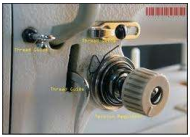
HOW TO MAKE ADJUSTMENT ON THE MACHINE
There are two tension adjustments on the sewing machine the upper and the lower. The upper tension controls the thread from the needle, while the lower tension controls the thread from the bobbin case. These tensions must be adjusted to suit various fabrics. If the tensions on both threads are properly adjusted, the threads will lock at the center of the material and form a correct stitch.
The size of the stitches varies with the type of work being sewed. Thin materials require a short stitch, a light thread, a fine needle, and a tight tension. Heavier materials require a longer stitch, a coarser thread, a larger needle, and less tension.
Sewing machine needles become dull through hard usage and also through ordinary wear; sometimes, they become bent by improper use. The condition of the needle should be checked when sewing difficulties occur. A defective needle should be replaced by a new needle of proper size. A dull needle will show a flat shiny spot at the very tip when rotated between the fingers. The straight of a needle can be tested by rolling the larger end on a flat surface; bent needles will wobble and straight needles will roll true.
A. HOW TO ADJUST TENSION ON THE NEEDLE THREAD
The stitch tension control determines the amount of tension on the thread as they pass through the machine.
1. Correcting a Loose Top Stitch
When the needle thread tension is too tight, the thread will lie straight along the upper surface.
- Lower the presser foot
- Turn the small thumb nut at the front of the tension discs to the left (counter clockwise) to decrease the tension.
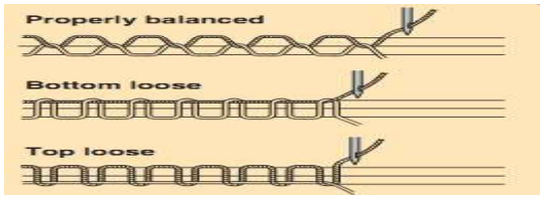
2. Correcting a Loose Bottom Stitch
When the needle tension is too loose, the thread will lie along the underside of the material.
When the needle tension is too loose, the thread will lie along the underside of the material.
- Lower the presser foot
- Check to make sure that the thread is between the tension discs.
- Turn the small thumb nut at the front of the tension disc (clockwise) to increase the tension.
- Check the stitch on pieces of scrap material.
|
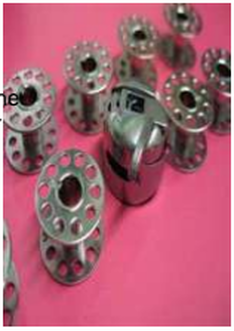
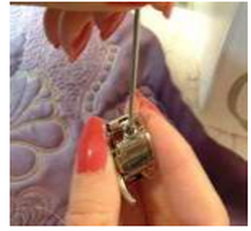
B. HOW TO ADJUST TENSION ON BOBBIN THREAD
1. Checking Bobbin Case
Note: If the tension spring is bent away from the bobbin case, or if the ends of the spring near the delivery eye are damaged, they should be replaced. Consult your teacher if defective parts are discovered. 2. Adjusting Tension Spring on Bobbin Case The tension on the bobbin thread is controlled by adjusting the tension spring on the outside of the bobbin case. It is seldom necessary to change this adjustment once the tension has been properly set. The operator will usually be able to correct the stitch by varying the tension on the needle thread. A. Correcting a loose bobbin thread If the tension on the bobbin thread is too loose, the needle thread will lie straight along the upper surface of the material.
B. Correcting a Tight Bobbin Thread If the tension on the bobbin thread will lie straight along the underside of the material.
|
|
HOW TO REGULATE THE LENGTH OF THE STITCH
The length of the stitch is regulated by the stitch regulator on the front side of the head.
Note: For normal stitching, set the regulator at 10 to 12 stitches per inch, or at the number 3 for metric scale machines.
The length of the stitch is regulated by the stitch regulator on the front side of the head.
- Move the stitch regulator downward to lengthen stitch
- Move the stitch regulator upward to shorten stitch.
- Check the length of stitch on pieces of scrap material.
Note: For normal stitching, set the regulator at 10 to 12 stitches per inch, or at the number 3 for metric scale machines.
HOW TO REGULATE THE PRESSURE ON THE MATERIAL
The pressure on the material is regulated by adjusting screw on the top of the machine.
- Turn the adjusting screw to the right to increase the pressure.
- Turn the adjusting screw to the left to decrease the pressure.
- Check the pressure by stitching on pieces of scrap material of the same weight.
Note: A pressure that is too heavy will cause the machine to run hard and will leave the print of the feed on fine materials.
LEARNING OUTCOME 2
Clean and lubricate machine
PERFORMANCE STANDARDS
Materials:
1. Sewing machine
2. Damp cloth
3. Machine oil
Clean and lubricate machine
PERFORMANCE STANDARDS
- Regular cleaning of machine is observed
- Safety procedures in machine cleaning are followed.
- Regular maintenance schedules are observed and recorded
Materials:
1. Sewing machine
2. Damp cloth
3. Machine oil
What Do You Need To Know?
Read the Information Sheet 1.1 very well then find out how much you can remember and how much you learned by doing Self-check 1.1.
Information Sheet 2.1
Care of Sewing Machine
How to Clean and Oil Your Sewing Machine
Cleaning and oiling your sewing machine is basic maintenance that bits of lint, thread, dust and even fabric can get stuck in your machine. These make work harder and can even jam your sewing machine. Clean your machine to fix these help the machine to last longer and perform more smoothly. If you sew regularly, problems and use sewing machine oil to help the moving parts function smoothly. You should clean and oil your machine after finishing any large project as well as any time you suspect it is having a problem.
INSTRUCTIONS:
1. Prepare the needed tools and supplies in cleaning the sewing machine.
2. Remove the needle if there is any. This will prevent the cleaner from pricking fingers during the cleaning process.
Face Plate (presser bar, needle bar, thread take up lever, lifter).
- Unscrew face plate and keep it in the drawer while cleaning.
- Brush dust away then put a little amount of oil while rotating the balance wheel to inner parts can be accessed.
- Put back the Face Plate in place
UPPER TENSION (DISC SPRING AND DIAL)
- Remove outer bolt, tension dial, discs and disc spring.
- Lay each part in your front table following its disassembling for easier assembling.
- Brush dust and wipe with absorbent cloth with oil.
- Assemble by following the laid parts in your table.
LOWER MECHANISM (ROTARY OSCILLATING HOOK)
- Remove bobbin case.
- Fasten sides of oscillating hook.
- Remove dust with lint brush.
- Put a little amount of machine oil on moving parts.
- Return spare parts in place.
OTHER MINOR PARTS
- Remove entangled threads between head and balance wheel.
- Brush accumulated dust in the treadle joints connecting the band wheel.
- Clean gummy dust on the band wheel.
- After all parts were dusted, lubricate all joints and oil slots with good quality oil.
- Wipe off all surplus oil then put a piece of absorbent cloth under the presser foot for dripping oil.
Note: When the machine has thoroughly cleaned and oiled, run it slowly for several minutes to allow the oil to work on its moving parts. Place a scrap of fabric under the presser foot and lower the needle to absorb excess oil.
OCCUPATIONAL HEALTH AND SAFETY PROCEDURE IN SEWING MACHINE MAINTENANCE
Cleaning and lubricating a sewing machine is quite a messy task. Personal care should be observed during this activity. The following health and safety precautions should be practiced at the shop or at home.
1. Wear personal protective equipment. This prevents your clothing from being tarnished by oil and dirt .Be sure to wear gloves to avoid accumulation of oil and dirt in your nails and palms. (Wearing of protective eye glasses is optional).
2. Remove the upper belt or turn power off before oiling the sewing machine.
3. When a chemical or small spare parts get into your eyes, call the attention of your teacher at once.
4. Do not remove any safety device from any machine.
5. Be sure that all screws are well-lightened before starting the machine.
6. Make sure that no screws or tools are left on the floor to avoid slipping.
7. Wipe dry spilled oils on the floor to avoid accidents.
8. Assign colored tags for a newly maintained sewing machine
9. Provide a small bin for your garbage when performing this job.
10. Have a separate cabinet or storage for tools and supplies for sewing machine maintenance.
11. Always refer to the sewing machine service manual for accurate application of procedure.
Note: A sewing machine is an equipment that needs care and cleaning. Keep it dusted and lubricated at least once a week or more often if the machine is in constant use.
